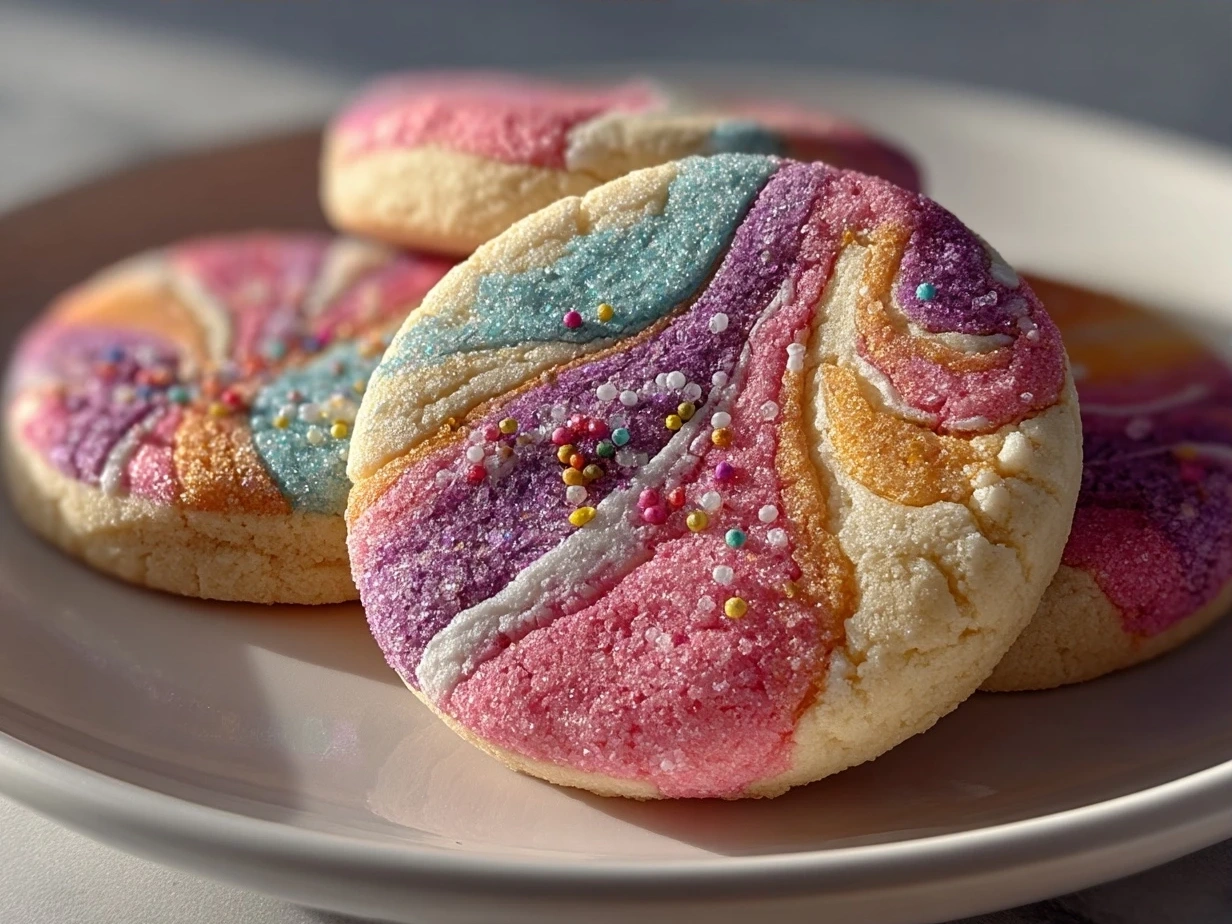
Okay, let’s talk cookies! As a mom, I know how much a simple treat can brighten a day, and these Colorful Marbled Sugar Cookies are a real win in our house. It all started when my youngest declared everything needed more “sparkle.” I’m Beatriz, from MommiesMore, and I’m all about finding ways to make family meals easy and fun.
The first time I tried making these Colorful Marbled Sugar Cookies, I was a little intimidated. But it turned out to be way easier than I thought, and the kids absolutely loved helping with the marbling. Plus, seeing their faces light up when they saw the colorful swirls made it all worthwhile. These Colorful Marbled Sugar Cookies bring a bit of joy and comfort to our family moments, and I’m excited to share this simple recipe with you. Let’s face it, we all need a little comfort in our cozy chaos! I’m here to help fellow busy moms who are seeking simple comfort food solutions!
INGREDIENTS You’ll Need:
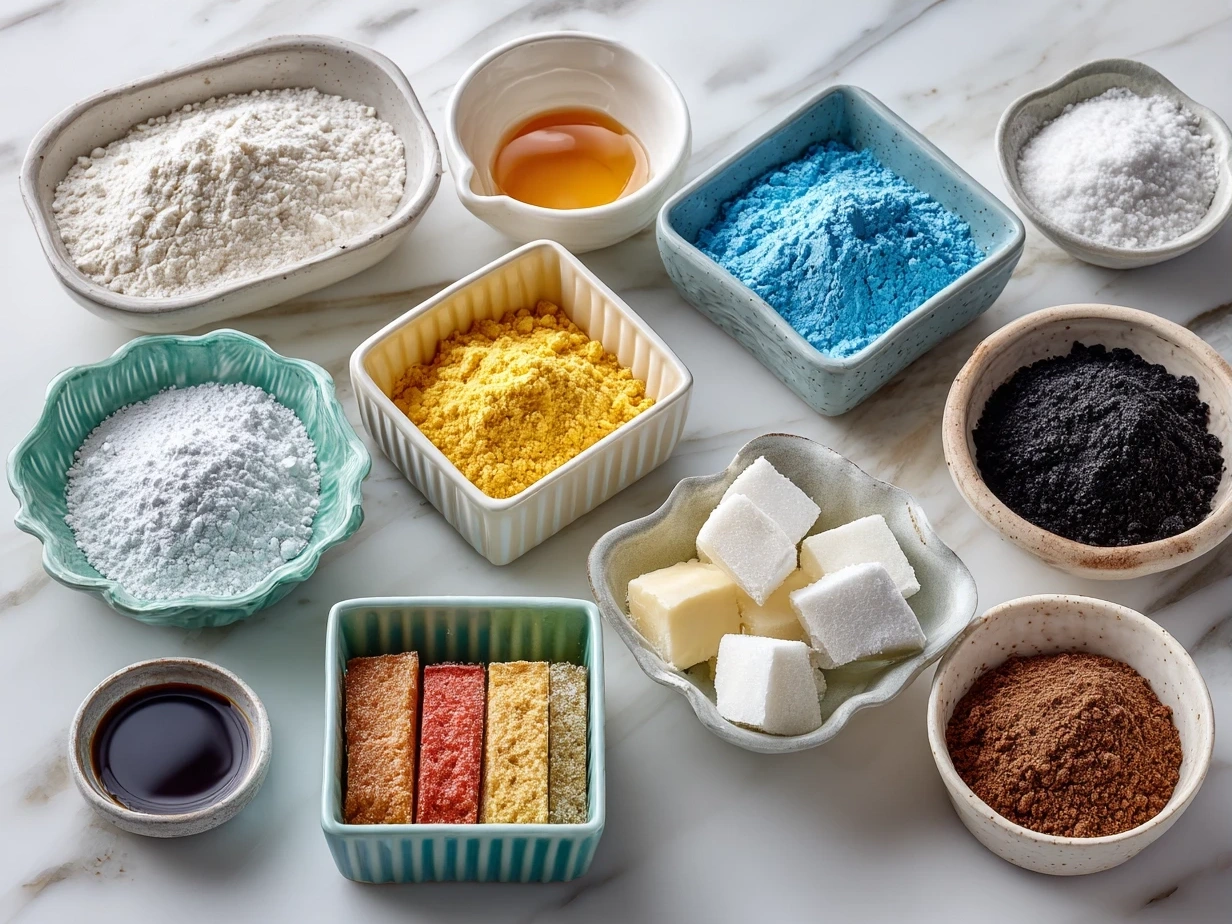
- 3 cups all-purpose flour: A good base for our comforting cookies.
- 1 teaspoon baking powder: This helps the cookies rise and be soft.
- ½ teaspoon salt: Balances the sweetness.
- 1 cup (2 sticks) unsalted butter, softened: Makes the cookies rich and tender. I always have this on hand for easy baking!
- 1 ½ cups granulated sugar: For sweetness, of course! You can use brown sugar for a caramel comfort.
- 2 large eggs: Binds everything together.
- 1 teaspoon vanilla extract: Adds a lovely flavor. My family gets extra comfort when I double this.
- Royal icing: (Recipe Below)
- 4 cups powdered sugar: The foundation of our sweet icing.
- 3 tablespoons meringue powder: This helps the icing harden.
- ½ cup warm water: To bring it all together. Add more for desired consistency.
- Gel food coloring: (Assorted colors) For that beautiful marbled effect. I let the kids pick the colors!
Royal Icing:
- Divide the royal icing into separate bowls, one for each color you’d like to use.
- Add a few drops of gel food coloring to each bowl and mix well until you achieve your desired colors.
- Thin each color with a little water until it reaches a flooding consistency. This means it should be thin enough to spread easily but not so thin that it runs off the cookie.
Trust me, this Colorful Marbled Sugar Cookies ingredient list is simple because busy moms need comfort without complexity! You can find these simple ingredients at your regular grocery store. This Colorful Marbled Sugar Cookies proves delicious doesn’t mean expensive.
Let’s Make it Happen!
- Make the Cookie Dough: In a large bowl, whisk together the flour, baking powder, and salt. Set aside. I always make sure to measure carefully for the perfect cookie texture.
- Cream Butter and Sugar: In a separate bowl, cream together the softened butter and granulated sugar until light and fluffy. This is where your electric mixer comes in handy!
- Add Eggs and Vanilla: Beat in the eggs one at a time, then stir in the vanilla extract. Make sure everything is well combined for a smooth dough.
- Combine Wet and Dry Ingredients: Gradually add the dry ingredients to the wet ingredients, mixing until just combined. Be careful not to overmix.
- Chill the Dough: Wrap the dough in plastic wrap and chill in the refrigerator for at least 1 hour. This helps prevent spreading while baking. This is the perfect time to prep tomorrow’s lunch!
- Roll Out the Dough: Preheat your oven to 375°F (190°C). On a lightly floured surface, roll out the dough to about ¼ inch thickness.
- Cut Out Cookies: Use your favorite cookie cutters to cut out shapes. Place the cookies on a baking sheet lined with parchment paper.
- Bake: Bake for 8-10 minutes, or until the edges are lightly golden. Your Colorful Marbled Sugar Cookies should smell amazing by now.
- Cool: Let the cookies cool on the baking sheet for a few minutes before transferring them to a wire rack to cool completely.
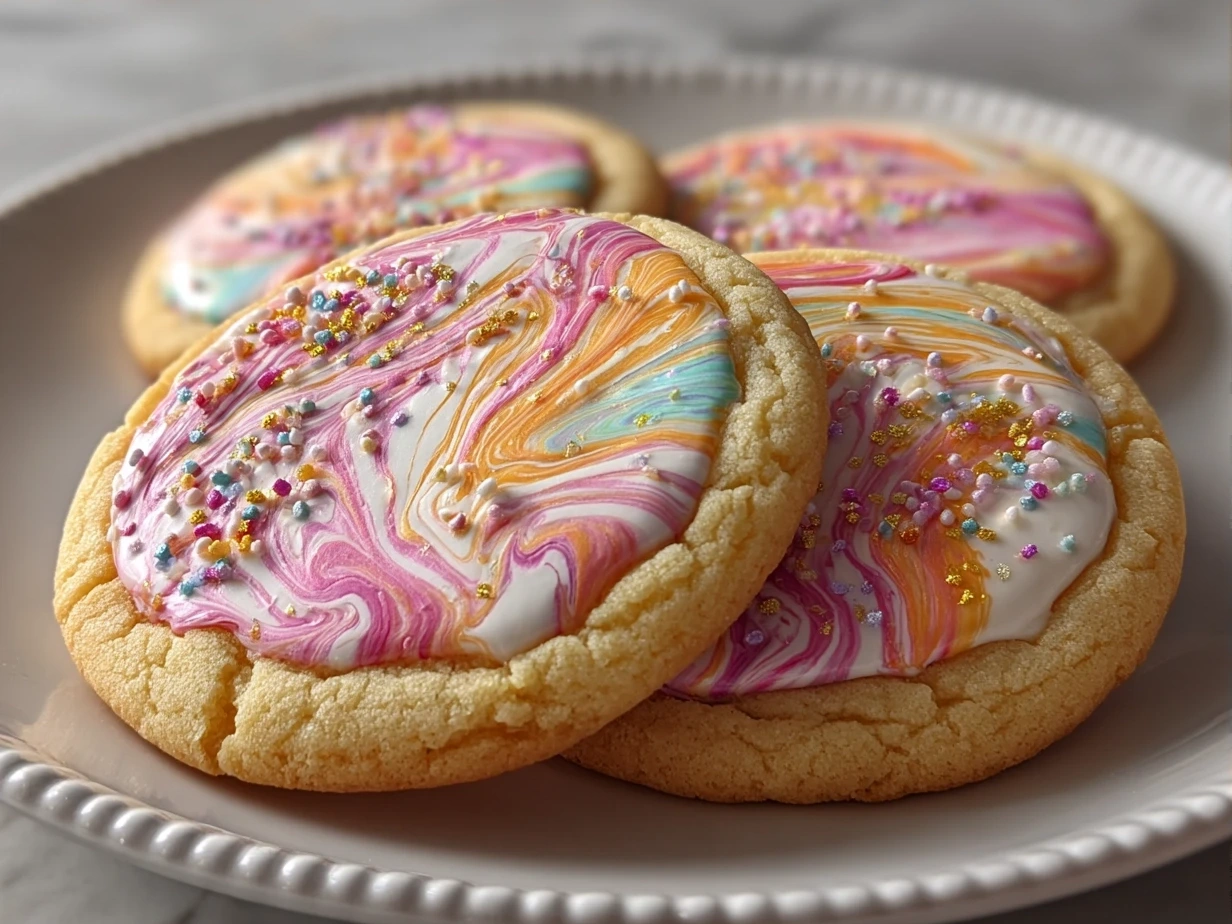
- Prepare the Marbling: Once the cookies are completely cool, it’s time for the fun part! Prepare your colored royal icing in separate bowls.
- Flood the Cookies: Flood each cookie with a base layer of white royal icing. Let this layer set for about 30 minutes.
- Create the Marble Effect: While the base layer is still wet, drop small dots of your colored icing onto the white icing. Use a toothpick or skewer to gently swirl the colors together, creating a marbled effect.
- Let the Icing Set: Allow the icing to set completely, which usually takes several hours or overnight. Here’s where I used to struggle with my Colorful Marbled Sugar Cookies – learn from my experience!
- Enjoy: Now, sit back, relax, and enjoy your beautiful, Colorful Marbled Sugar Cookies!
In my busy kitchen, this comforting Colorful Marbled Sugar Cookies usually takes an hour or two, but the decorating is where we really have fun. Don’t worry if your Colorful Marbled Sugar Cookies looks imperfect – that’s part of their charm!
While your Colorful Marbled Sugar Cookies is cooling, take a moment to appreciate creating comfort for your family! If you’re looking to elevate your cookie game, check out Soft Marbled Sugar Cookies with Royal Icing: Recipe w/ Video.
How We Love to Eat This!
My kids devour this comforting Colorful Marbled Sugar Cookies when I serve it with a cold glass of milk or hot chocolate. They love helping decorate them for special occasions like birthdays or holidays. These Colorful Marbled Sugar Cookies are perfect for those busy weeknights when we need comfort food fast!
We often make a batch of these cookies for school bake sales or to share with neighbors. It’s a great way to spread some joy and comfort in our community. Plus, it’s always a hit! The kids get so proud when people compliment their Colorful Marbled Sugar Cookies.
For a seasonal variation, try adding a hint of peppermint extract to the dough during the holidays or lemon zest in the spring. You can also experiment with different food coloring combinations to match the season.
Leftovers? What leftovers? Just kidding! But if you do have any leftover cookies, they’re great with a cup of coffee the next morning or as a sweet treat in school lunches. I sometimes crumble them over yogurt for a fun and easy dessert. For more simple comfort food ideas for busy families, check out sugar cookie recipes on MommiesMore.
FAQs: Your Questions Answered
- Is this Colorful Marbled Sugar Cookies really filling enough for growing kids? Absolutely! The cookies provide a good source of carbohydrates for energy, and you can always pair them with a healthy snack like fruit or yogurt.
- What if my picky eater won’t try this Colorful Marbled Sugar Cookies? Try involving them in the decorating process! Kids are often more willing to try something they helped create. You could also use their favorite colors or cookie cutters.
- Can I meal prep this Colorful Marbled Sugar Cookies for busy weeks ahead? Yes! The dough can be made ahead of time and stored in the refrigerator for up to 2 days. You can also bake the cookies and freeze them, undecorated, for up to a month. Just thaw and decorate when you’re ready.
- What’s the best way to store these Colorful Marbled Sugar Cookies? Store them in an airtight container at room temperature. They’ll stay fresh for about a week.
- Can I use different types of flour? While all-purpose flour works best for this recipe, you can try using gluten-free flour for a gluten-free version. Just be sure to add a binder like xanthan gum to help with the texture.
- How do I prevent the cookies from spreading too much in the oven? Chilling the dough is key! It helps the butter firm up, which prevents the cookies from spreading. Also, make sure your oven is at the correct temperature.
- Is there a substitute for meringue powder? If you don’t have meringue powder, you can use pasteurized egg whites instead. Just be sure to adjust the amount of liquid in the icing accordingly.
- What do you do if your icing is too thick or too thin? If your icing is too thick, add a little more water, a teaspoon at a time, until you reach the desired consistency. If it’s too thin, add a little more powdered sugar. It is best to learn Sugar Cookie Icing Technique for a perfect outcome.
Final Thoughts:
These Colorful Marbled Sugar Cookies are more than just a treat; they’re a way to bring joy and comfort to your family. I hope this recipe makes your kitchen a little brighter and your family moments a little sweeter. My Colorful Marbled Sugar Cookies comfort hacks: Always chill the dough, involve the kids in decorating, and don’t stress about perfection.
- Chocolate Chip: Add chocolate chips to the dough for a chocolatey twist.
- Lemon Zest: Add lemon zest for a bright, citrusy flavor. My oldest loves this version!
- Peppermint: Add peppermint extract for a festive holiday treat. The little one always asks for these during Christmas!
Remember, the best part about cooking is making it your own. Feel free to experiment with different flavors and colors to create your own unique Colorful Marbled Sugar Cookies. If you need more inspirations, check out Marbled Butterfly Sugar Cookies • Sarahs Bake Studio. I encourage you to try this satisfying Colorful Marbled Sugar Cookies for your family’s mealtime success.
\n \n Print
Colorful Marbled Sugar Cookies
These colorful marbled sugar cookies are as fun to make as they are to eat! Swirl vibrant colors into the dough for a unique and beautiful treat, perfect for any occasion.
- Prep Time: 30 minutes
- Cook Time: 10 minutes
- Total Time: 40 minutes
- Yield: 24 cookies
- Category: Dessert
- Method: Baked
- Cuisine: American
Ingredients
- 1 cup (2 sticks) unsalted butter, softened
- 1 ½ cups granulated sugar
- 2 large eggs
- 1 teaspoon vanilla extract
- 3 cups all-purpose flour
- 1 teaspoon baking powder
- ½ teaspoon salt
- Gel food coloring (various colors)
Instructions
- In a large bowl, cream together the butter and sugar until light and fluffy.
- Beat in the eggs one at a time, then stir in the vanilla extract.
- In a separate bowl, whisk together the flour, baking powder, and salt.
- Gradually add the dry ingredients to the wet ingredients, mixing until just combined.
- Divide the dough into several small bowls, one for each color you want to use.
- Add a few drops of gel food coloring to each bowl and mix until the color is evenly distributed.
- Roll small pieces of each colored dough together to create a marbled effect.
- Wrap the marbled dough in plastic wrap and chill for at least 30 minutes.
- Preheat oven to 375°F (190°C).
- Roll out the dough on a lightly floured surface to about ¼ inch thickness.
- Use cookie cutters to cut out desired shapes.
- Place cookies on a baking sheet lined with parchment paper.
- Bake for 8-10 minutes, or until the edges are lightly golden brown.
- Let cool on the baking sheet for a few minutes before transferring to a wire rack to cool completely.
Notes
For extra flavor, add a pinch of almond extract to the dough along with the vanilla. Decorate the cookies with icing and sprinkles after they have cooled completely.